Disclosure: As an Amazon Associate, I earn from qualifying purchases. This comes at no additional cost to you.
Are you getting disturbed by the sound that comes from noisy neighbors? Now, this is important to you to block noise by soundproofing interior walls panels.
But you are thinking about how it is possible to do that. You are also finding the right way to soundproof your existing room wall that is already built between apartments or other rooms.
You know that the population is growing day by day. But there must be a way that you are finding to reduce sound pollution anyhow.
With the growth of population, impact noise is also increasing day by day. For lack of space, people are deciding to choose a rental house.
In a rental house, there are many families living there. Different kinds of families stay in a small rental area. So sound energy can pass from one family to another.
Building construction is important for maintaining a soundproof environment. If your room partition is not well set up, then the neighbor sound comes to your room.
A timber board is popular to separate two rooms for two families. If the timber sound isolation board or acoustic plasterboard is not well set up, then external noise like neighbor sound can come to your room.
Though most of the time our room wall is made of brick with cement and airborne sound may come for various reasons. If any brick or concrete walls are not set up properly, then any sound of the neighbor can come to your room.
So for all these bad situations, you need to follow some techniques for soundproofing. For this, you should set up sound-absorbing and soundproofing accessories in an easy way.
You also need an easy soundproof setup system, if you are a beginner. This is the reason why here I am telling you about some steps that you can implement at any time.
There is no need to be a knowledgeable person for installing these techniques. But one thing that you should require. That is your concentration on doing your activities for implementing soundproof accessories in a room.
By rearranging some things, you can get help to soundproof the internal and external solid walls of a room. To do it you need to follow the below notes that I will explain in a simple way. So you should keep reading.
At first, you will need some things before starting your goal about soundproofing an original wall. By installing soundproofing compounds, you can reduce sound levels from your area. On the other hand, you need to install sound-absorbing material to remove unwanted noise from your room too.
If you don’t know the difference between these two topics, then read the article about soundproofing material vs sound-absorbing material. If you have some knowledge about the difference between them, then it will be easy for you to apply these steps.
There are two types of noise. One is structural noise and the other is air noise. For soundproofing a double stud wall, you need to stop both two types of sound.
Now, I am coming to the point. Here, I will discuss with you directly how to soundproof wall layers with easy steps. So let’s start to implement accessories for soundproofing.
Soundproofing Existing Brick Walls without Removing Drywall
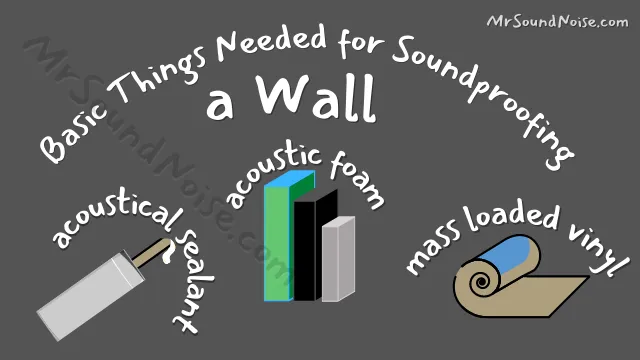
Things are needed for soundproofing an entire brick wall that is already built. For collecting these accessories, you don’t need high knowledge.
Set up accessories with the given instruction and check carefully. These items are given below with a serial list.
Item One: At first you will need an acoustical sealant or acoustical caulk. It helps you to fill cracks in the wall.
Item Four: If there is already drywall, then it’s ok. Otherwise, for a serious case, you will need additional layers of drywall sheets.
This acoustic grade drywall will help you to stop the deepest sound frequencies in a serious case at any time. If you use double-layer drywall, then it will be better.
Item Five: You will need a marker or pen. This thing will help you to mark cracks in a wall.
All these six things will be required for preparing a surface more soundproof. Now, you need full guidelines step by step for solving this issue.
So I can tell you that you can get your notes if you read this total blog post and give a concentration in reading guidelines that I will explain now.
Through these guidelines, you can apply in both brick material wall or wood wall or any wall. So this is the positive side to you.
The discussion will be about adding soundproof accessories to the existing room wall. There will be a few specific instructions about installing noise-absorbing accessories.
At the early stage, I also had no guidelines to solve this problem. After searching a lot, now I have made a quick decision about how to keep a room more silent.
Some soundproofing methods that you cannot imagine and let’s start to begin the journey.
Step One: Fill the Cracks of an Existing Wall
You should find the most common issue in the room. There are more cracks that are available in thin wall layers. For example, thin wood, plastic, and hardboard walls have small cracks most of the time.
Through these cracks, sound waves can pass from noisy neighbors to your room from the sound source.
For filling these cracks at first, you should find out cracks. If you follow my given idea, then you can find these cracks.
Suppose, there are two rooms in a house. You are living in one room and the other room your neighbor is living in.
Now close all the windows and doors and switch off the light in your room. At the same time make sure that the light switch is on in the other room where your neighbor lives.
Now, check your room wall from the dark side. Then you can see that light rays are coming from your neighbor’s room to your room through many cracks in the wall.
Instant mark these cracks with a pen or marker. After finding all cracks, fill them with acoustic sealant. It has the ability to fill any small gap, crack, and air cavity.
You can fill any crack by using this type of soundproof caulk or sealant. But you need to know the function and difference of acoustic caulk and sealant before using.
Acoustic sealant is a material that is expanded according to temperature and it is one kind of elastic type material. This material is normally made of silicon.
When this material will shrink or expand, this depends on weather temperature. On the other hand, acoustic caulk is not shrinkable or expandable like an acoustic sealant.
When an acoustic caulk is used in any crack, it is permanently fixed in the crack after drying.
There is a point that you should know how to use acoustic caulk or sealant to fill any crack.
Using Guidelines of Acoustic Sealant
To use acoustic sealant, you should use a caulking gun. I know that now you have a question about what a caulking gun is and how to use it.
The function of a caulking gun is actually simple. Even a little boy can operate it. So you don’t need any tension about using it.
Caulking guns are not as complicated as other ones. Normally it has a plastic nozzle, pressure piston, handle, etc.
Now, I am telling you how to operate a caulking gun using this sealant. You should know that both acoustic sealant and acoustic caulk are used with the help of a caulking gun.
First, select a caulking gun and cut the top part of that container bottle where the sealant comes out. There are some plastic nozzles with container bottles.
Take a nozzle and cut the top part at a 45-degree angle. You can also cut the top part as your requirement. This nozzle is made of plastic so you can cut the top part.
Then add the plastic nozzle to that sealant container bottle. Then take a caulking gun and put the container bottle into the caulking gun and you can do this setting easily.
Next, when you press the handle, sealant comes out through the container bottle. Thus you can use acoustic sealant spontaneously.
After preparing that sealant, go to the crack area. There is needed smooth pressure to use that sealant to fill cracks. Before using this sealant, try to clean all cracks.
After cleaning these cracks, dry them by waiting some time. For using this sealant, point the plastic nozzle to the crack and fill the crack carefully. After filling the crack, you can press the crack area for actual filling.
After some time, you will see that this applied sealant in the crack area becomes hard and is filled. Thus you can use any acoustic sealant as your requirement.
This sealant can be used in wood, aluminum, plastic material, concrete building wall, hardboard, etc. You can use it as the adhesive too.
I think now you can understand how to use acoustic sealant and what its function of it.
Now, you can go to the next step for soundproofing the wall. In the next step, I will tell you how to add an extra layer to the wall. So keep reading to know the second step.
Now you need sound insulation for adjacent walls or any walls. For doing this, you should install wall coverings for creating more soundproof areas in your house.
Step Two: Use Mass Loaded Vinyl
When a wall is thin, there may be small cracks in it. In this situation, you should increase the thickness of it to convert a soundproofing wall.
Now, the question is how to increase the thickness of the existing wall in an easy way. If it is possible to increase the wall thickness, then of course it will be sound protective.
Increasing the thickness is also another solution for creating more soundproofing. Now in this situation, you can use MLV in the flat walls for increasing the thickness.
The full meaning of MLV is mass-loaded vinyl. It contains calcium silicate and it converts the mass-loaded vinyl to a stronger barrier.
By adding mass-loaded vinyl to the wall, you can create a powerful barrier for stopping airborne noise passing through any wall and It has the capability of thermal insulation too.
MLV has a high STC rating to stop the sound transfer effectively. It is made from vinyl and contains high synthetic plastic material.
This is the reason why mass-loaded vinyl is capable of stopping the transmission of sound from passing through it spontaneously.
Mass-loaded vinyl is also a thin layer material of sound dampening. So you can add it to the wall in an easy way.
The more good news is that it has the high capability to absorb reflected sound waves very well. If there is available MLV in an already built wall, then sound reflection cannot be created and MLV makes the room more silent.
Next, I will tell you how to set it up in an easy way. I know, now you are thinking this type of question in your mind. So read below the writing for knowing your answer.
Setup MLV (mass loaded vinyl)
One: Measure the wall where you want to add mass-loaded vinyl.
Two: Cut mass-loaded vinyl according to the measurement.
Three: You should start at the top side of the wall. Then go to the bottom side.
Four: Stapler the mass-loaded vinyl on all sides so that it is fixed with the wall properly.
Five: Make sure to cover all wall sides with mass-loaded vinyl.
This is how you can easily set up mass-loaded vinyl in a quick way. If you don’t like to install it, there is also another solution for you.
The solution is that you should install drywall in the wall area. Although this solution is expensive, you can get benefits by installing it.
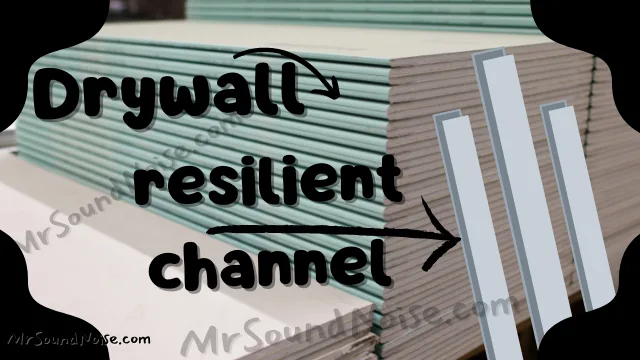
Step Three: Use Drywall
At first, it will be best for you, if you know what drywall (plasterboard) is. If you know about it, then you are welcome. But if you don’t know about this type of board, don’t worry.
I will tell you now what the drywall is and its functions. Normally it is made of gypsum, paper, additives, resin, etc.
It increases the thickness of the wall and makes a barrier to stop impact noises. To set it against impact noise, you should properly follow the guideline.
Drywall Setup
There is no extra work to set up extra drywall. You just need to collect some tools for installing it. However, for the installation of thicker drywall, instructions are given with some points.
One: Measure the wall area with measuring tape.
Two: Cut drywall panel with woodcutter according to wall measurement.
Three: Screw the whole side of the drywall so that it can fit the wall area strongly.
Four: Keep a little bit of gap in the floor area.
Besides, you can use green glue to add drywall to your wall area. You may have a question about what green glue is.
Green glue is one kind of sealant that is also used as adhesive material. In using green glue, soundproof drywalls become more soundproofing panels because green glue acts as sound insulation.
This is how you can set drywall in your room. it will be better to get help from professional workers to install it properly.
Step Four: Use Drywall with Resilient Channel
Using drywall with the resilient channel (sound channel) is the advanced way to make a wall more soundproof and stop flanking noises too.
First, you should know about this metal channel and its function. A resilient channel is a metallic long device that is used to adjust drywall and keep gaps between wall and drywall.
Resilient channel with soundproof clips (whisper clips or resilient clips) reduces sound transmission and sound vibration and helps dry walls more soundproof. Now read the total installation process of the resilient channel.
The Installation Process of Resilient Channel
One: Set a resilient channel at the top edge of the wall.
Two: Then add drywall to the wall and screw the drywall with the resilient channel. For this setting, there is a gap between the wall and drywall. This gap helps to reduce noise levels spontaneously.
Besides installing drywall is the same that is told in step three. I also think that you should know a little bit more about resilient channels and you also know about structure-borne noise.
If you don’t know about it, then don’t be upset. I am talking a little bit about structure-borne noise because there is a relation between structure-borne noise and resilient channels.
For a clear understanding of the actual function of a resilient channel, you should know structure-borne noise. When a noise passes through any structure like metal, wood, etc, then that noise is called structure-borne noise.
So I want to tell you that basically, the function of a resilient channel is to stop structure-borne noise. This is the reason why there is a gap available between surface and drywall when there is a resilient channel.
Step Five: Arrange the Acoustic Mat Near the Wall Area
Most people do the wrong thing. They don’t keep acoustic mats near the wall. If you keep an acoustic mat, then it can absorb some noise.
This will be better to arrange rug carpet near the wall area. I think you have understood about keeping the acoustic mat arrangement.
Step Six: Use the Soundproof Blanket
The main function of the soundproof blanket is to absorb noise waves. But they can act as a soundproof material too. Normally, any soundproofing blankets and curtains in size.
So they are capable of stopping sound waves or sound vibrations too. For getting better results, you should install a reliable soundproof blanket and noise reducing curtain (for covering the wall side window).
Just hang this fabric on the wall and decorate it as you choose.
Step Seven: Apply Soundproof Paint in the Wall
Do you believe that there is available soundproof painting? In the past, I also didn’t think that it could be used to soundproof a wall. But all paints are not soundproof quality.
Only you need to use soundproof paint to achieve your goal. Basically, the density of soundproofing paint is high and it contains sound absorbing fillers (latex).
When you will prepare to collect acoustical paint, be sure you collect only this type of paint. You can use a paint roller for proper implementation.
Step Eight: Use Acoustic Foam Panel
Now I will tell you another most important thing that you should need to get a better facility. The best function of acoustic foam wall panels is to absorb sound waves spontaneously.
But it can be a great soundproofing material among other acoustic materials. There are various types of acoustic foam in the marketplace. But you don’t need to worry about which foam that you should use to be soundproof.
All types of acoustic foam panels have the same function for soundproofing. Basically, to do it, you just need the acoustic foam panel as your requirement. If you want to know more, then read this article about how does soundproofing work in any situation?
You can add this foam panel to the wall by using spray adhesive glue. This is also an easy way to set up this foam. You can use it at any place including corner walls as your requirement.
The positive news is that various colors of this foam are available in the marketplace. You can also decorate any surface area by using it.
Step Nine: Use Soft Material Near the Wall
This setting is not needed to invest a single penny. You just need to arrange some soft and rough home accessories according to the guideline.
First, check all your room areas and find out all the soft materials that you use. Soft and rough materials can be books, cloth shelves, and rug carpet.
After finding these soft and rough materials, move them near the wall side so that these materials can absorb some noise in the room. You know that any kind of rough and soft material is able to absorb any sound according to their criteria.
Hanging soft material on the wall will be a great idea to soundproof a room. Hanging soft material can be a curtain or blanket.
You can also keep a heavy rug mat near the wall area. This setting will give you a plus point. Acoustic tiles for walls also play an important role in keeping silent areas in the house.
Besides, you can add damping tiles for sound absorption automatically. (source)
This damping layer of a wall also can help you to reduce the sound waves in a room.
My Overall Viewpoint
I think you have understood after reading all these steps that are given above. If you read all these steps with full concentration, then I can tell you that you will be able to soundproof a wall successfully.
According to the budget, you can select a step as your requirement or you can use fiberglass insulation. You can also use acoustical and soundproof wallpapers for getting extra facilities from them.
When you soundproof your room wall, then noise will try to enter your room by room door or window. This is the reason why it is also important to soundproof these areas.
FAQ: Soundproofing a Wall
Can You Soundproof Any Existing Walls?
Yes, you can apply acoustic material for fixing the weak parts of the wall. You can also add an additional layer (drywall) to the wall for creating more soundproofing.
How Do You Soundproof Any Shared Wall in a Room?
You can also do that by fixing the holes, cracks, and other weak parts of the shared wall. For doing this, you need to set up acoustic accessories as required guidelines. So it is also important to keep a bathroom more soundproof.

 from Noisy Neighbours: 9 Tips")
 from Noisy Neighbours: 9 Tips")


